Sunday 20 April 2014

ZZzz... WAKE UP! The Bed is Done!

Again, two blog posts in one day!

Remember this?
This is the beginnings of our bed. We opted for a queen sized bed. A bit heavier and space wasting than a double but really, what do you do most of inside your motorhome? Sleep of course! You might as well be nice and comfy, right?

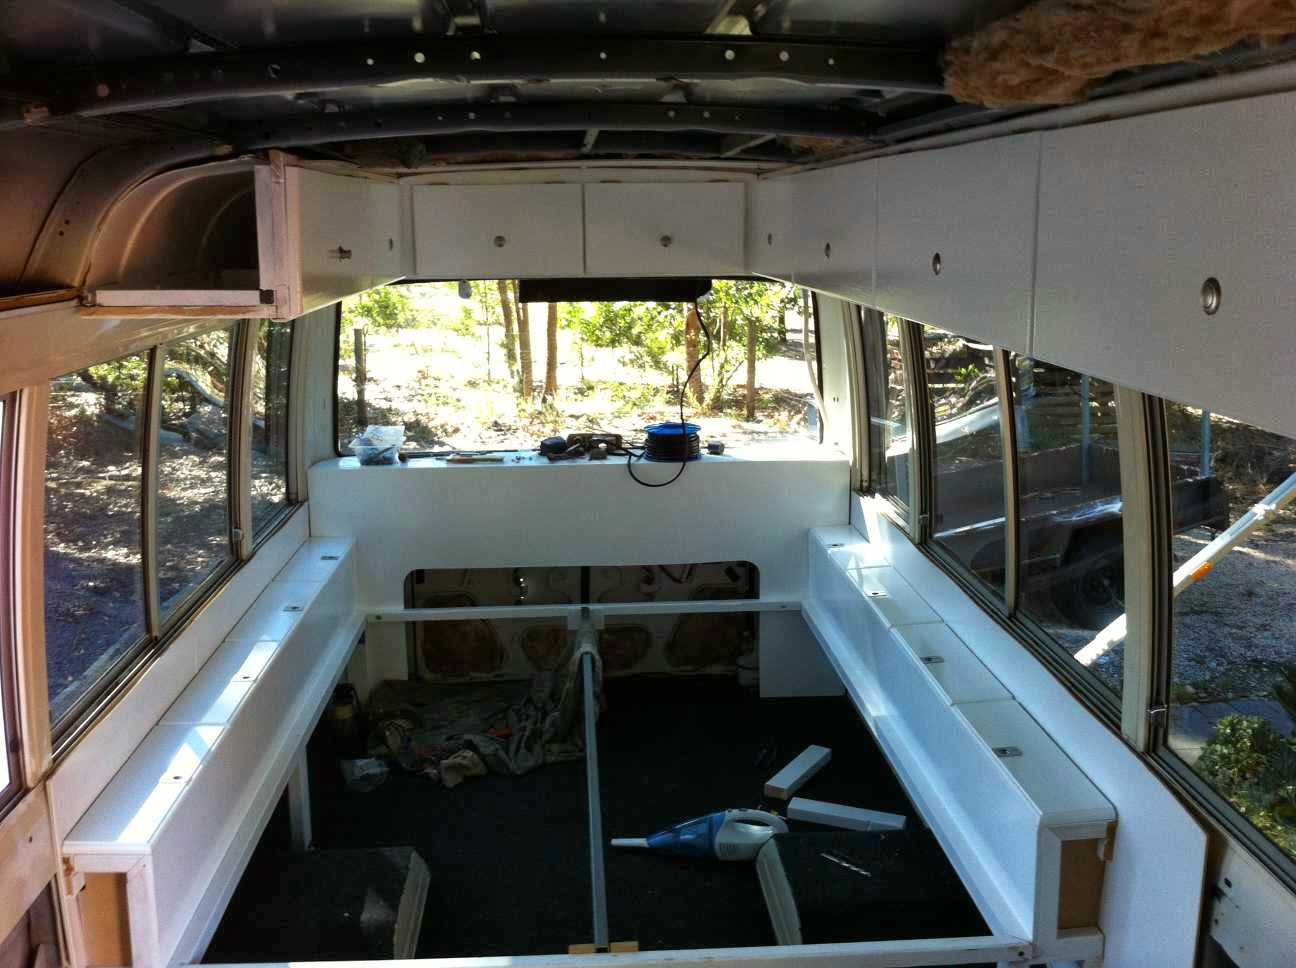
We are hoping to do most of our cooking/camp living outside and relax under the awning so it was important to us to have a comfy queen bed. We sacrificed some bathroom and kitchen space to put it in. We measured the brand new queen mattress in my step-son's room and planned around those dimensions. I don't like seeing doonas and pillows above the window of motorhomes so hubby even accounted for the depth of the mattress just for me!

To begin with, hubby used some MDF to make those side cupboards (see previous post) and the bedhead. The frame is bolted to the floor and walls with rivnuts, 3mm steel 'L' shaped angles and M8 bolts.
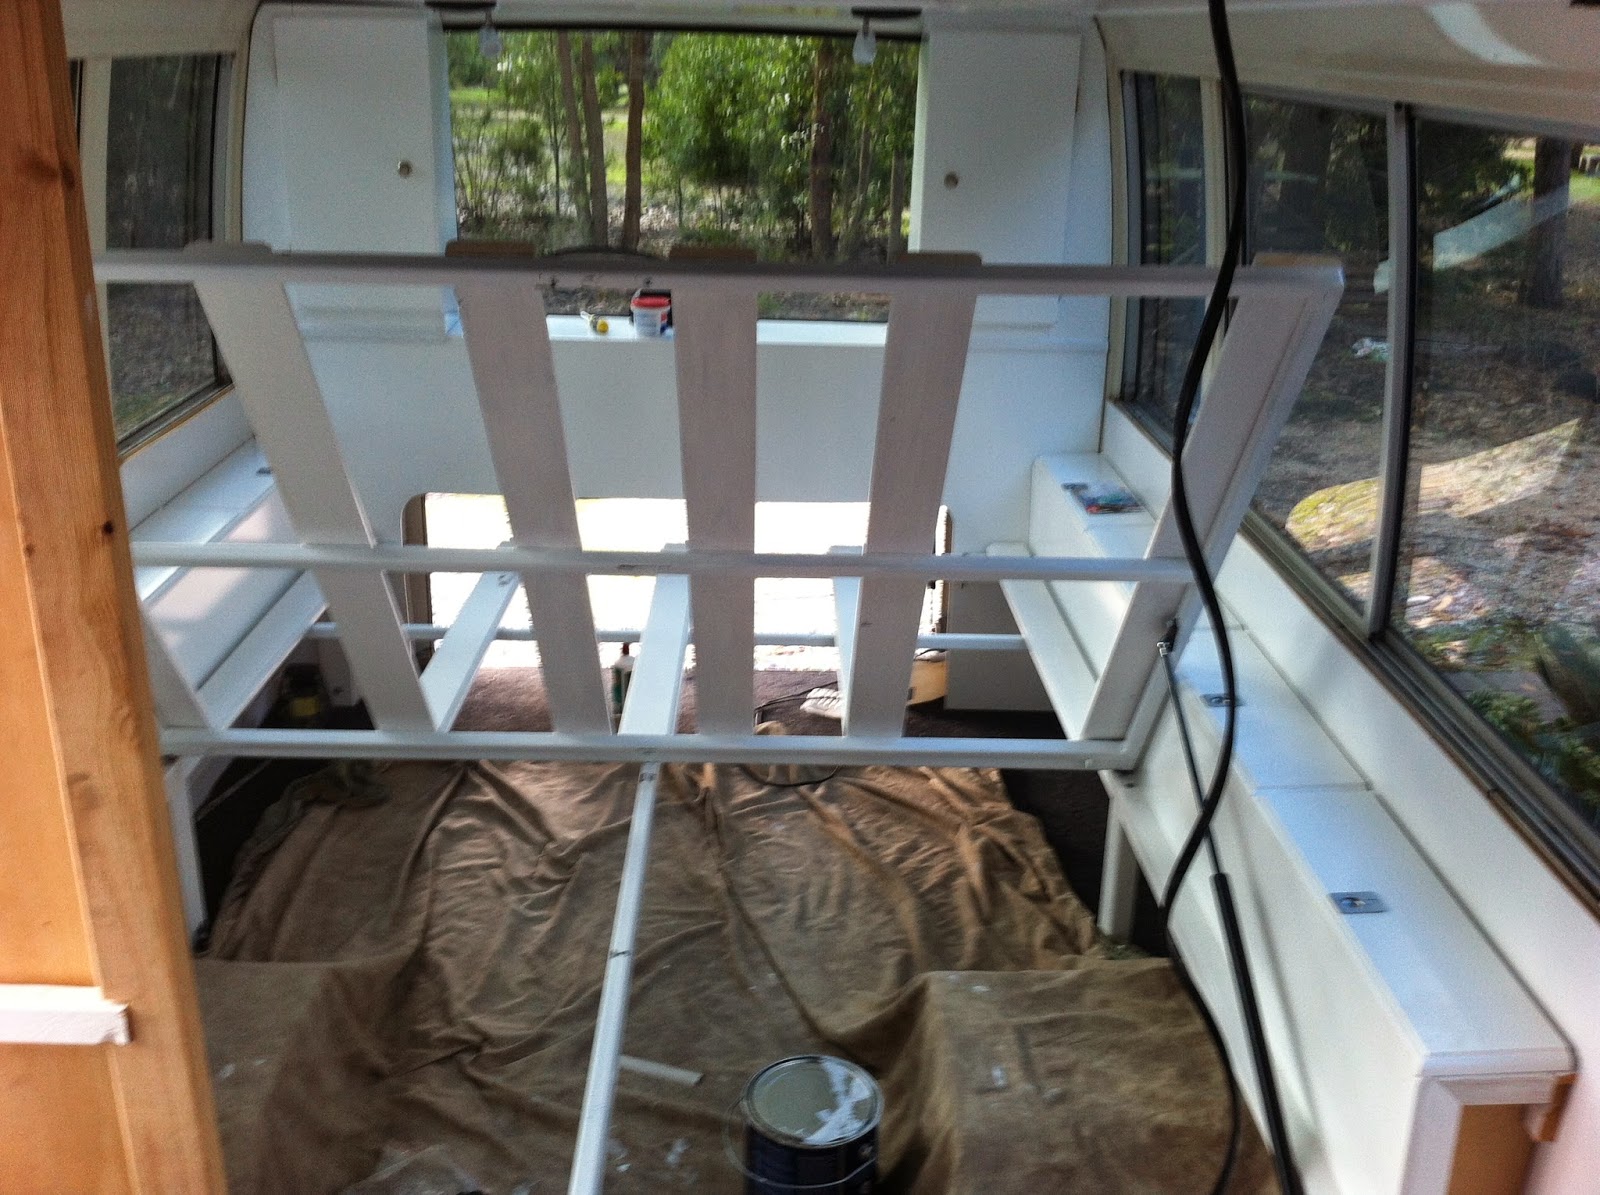
Next a piece of 3mm steel tubing (rectangular, 50mmx25mm) was attached to run down the centre and support the weight of us, the mattress and bed frame.

  Using 3mm steel box, he made the bed frame in 2 parts. He has also welded some 'platforms' for the hinges (see at the top of the frame?) Half of the bed will be bolted down. This end can be accessed from the boot. Half will lift on struts. The photo above is after painting.

Next he put them in the hole, bolted the boot end to the frame and welded the hinges on (again, 3mm steel ones from Mitre10).


The slats are pine and have been routed so the edges don't dig and rub into the mattress. The handle is brushed metal (Bunnings). We tried to select a shape which wouldn't snag on clothing or bedding, in that position.


We bought two of these struts from the CaravansPlus website (click for link) and installed them using the directions on the website and four of these little brackets: http://caravansplus.com.au/catalog/product_info.php?products_id=9130 

They seem excessively powerful when just on the empty bed frame! The struts are advertised especially for beds in vans so we took their word for it and bought them anyway.


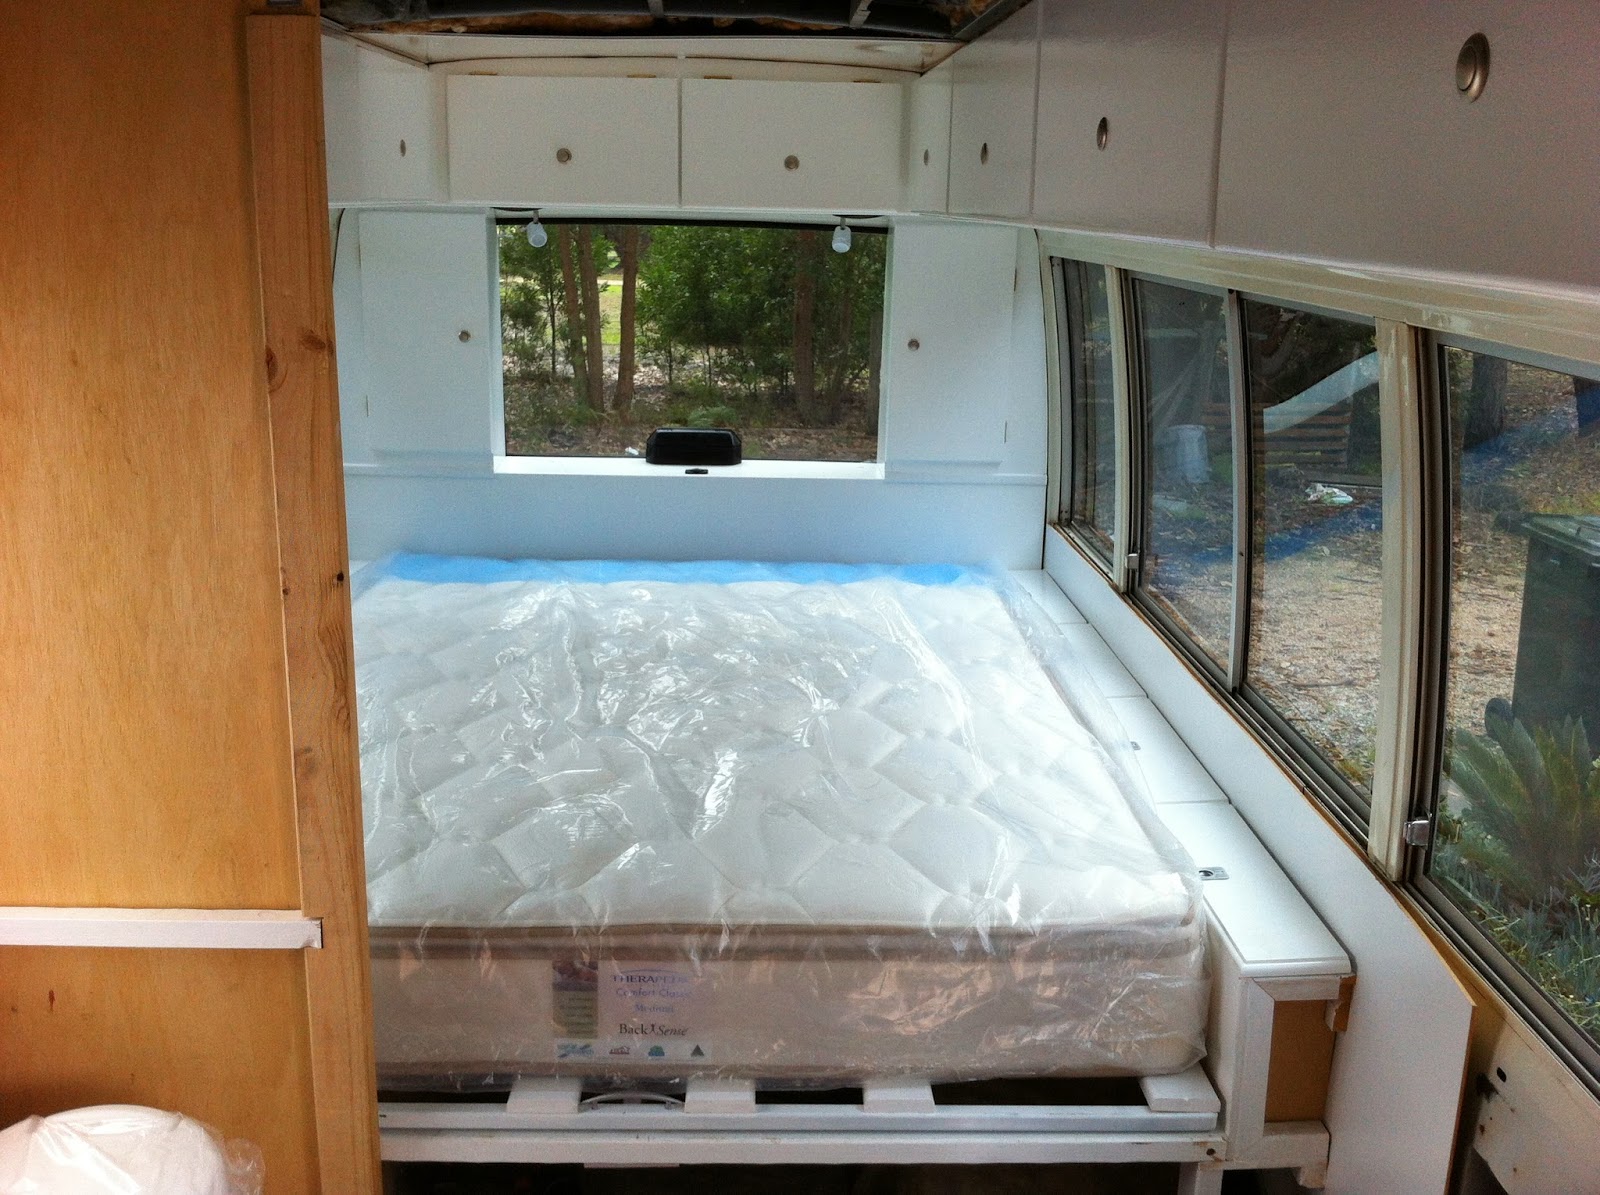
Luckily we were able to get the exact same mattress as the one we measured earlier. It was heavily discounted, being a slightly older model but at $400 and super comfy, I'm not complaining about having last season's mattress! Thank goodness for slow sales at rural furniture stores!
We squeezed the mattress through the door and got quite a fright when we wangled it almost into position... it seemed about 20cm too big! Thankfully it was just skewed and with a bit of a bump, it slid perfectly into place.

The struts work perfectly, even with the heavy mattress on top.


And that's the end of the story.

Bedhead Cupboards

We wanted to add a couple of cupboards on the back bedhead of the bus for a couple of reasons.

I wanted to be able to see out of the back window and adding the cupboards squared up the gap so a blind will fit in there more easily. It also means the reversing camera can be installed inside the bus, out of the weather and hidden away. Hubby wanted to close in the back window so the whole back would be storage. I guess this is a little compromise.

The bedhead space is handy for charging gadgets using a solar cell or the USB port we have installed. You can also toss a book up there when you're done reading and it is time for sleep... not to mention the remote control for the TV!

Here's how we did it.


Tint the window behind it nice and black so that when you're looking from the back of the bus, you don't see screws etc on the back of the cupboard (we used the same tint as for the rest of the windows... just more layers!) 
As you can see, the cupboards are made from laminated pine from Bunnings. Lighter than MDF and easy to work with. 
Cut, screw, putty, paint is basically how it works with these cupboards! There was a bit of messing about with cardboard templates and a jigsaw, to get the right curves. The back of the cupboards is the same lining as the walls. Plastic coated thin ply from Mitre10.


This cupboard hides the electrical cable for the USB port and the reversing camera cables. It is a good idea to plan out the electrical parts early, so you can hide as much as possible as you go. That conduit and the saddles are from Bunnings too. Cheap and easy. I believe it is the 20mm conduit.


Make some doors, attach matching locks (see the blog post about the top cupboards for eBay link) and tidy it all up with some timber edging. 

Friday 11 April 2014

NEW PAGE! Thermal Cooker Recipes.

You may or may not have noticed the new tab at the top of each blog post which says 'Thermal Cooker Recipes'.

A couple of months after buying the bus, I discovered thermal cooking. It seemed like a good idea so, unwilling to spend the big bucks on a Dream Pot, Shuttle Chef or Eco Pot, I went ahead and bought a cheaper Primus Brand 'Campfire' thermal cooker for $150 at Aussie disposals. It comes with a bag, smaller inner pot and trivet. I also bought the optional mess tin for cooking cakes and bread (I haven't tried it yet).
Click here for their online store: http://www.aussiedisposals.com.au/campfire-7lt-travel-cooker

Source: Aussie Disposals website.

My friends and family own the 'name brand' pots and they work really, really well. I'm not showing a preference for any of the brands, but MY pot is excellent. I love it.

One thing I did do was buy the books from Dream Pot as the instruction manual I got with mine only had about three recipes in it. The extra books were a good investment for a beginner.
The other good resources I found were:
Eco Pot (only a few recipes here) http://www.ecopot.com.au/Contents/Page/Recipes 
Shuttle Chef (apparently they also have a book but I haven't bought it) http://www.thermalcookware.com/main.php?mod=Dynamic&id=23
and
Pinterest isn't just about thermal cooking but people have 'pinned' some of their favourite recipes on there and if you do a search, you'll find them. Also, search for 'slow cooker' or 'crock pot' or even 'dutch oven' recipes because just about anything you can cook in one of those, can be cooked in the thermal cooker.

Of course, the best way to get to know the cooker and what it can do is to EXPERIMENT!

"What does this have to do with buses or motorhoming?" You ask.

Well, they use very little energy.
For a fall-off-the-bone stew, you will use about 20-30 mins of cooking energy. For rice: 2 mins cooking time! This is a great way to save energy on the road.
Although we will have a kitchenette in the bus, we are planning to cook most meals on the camp fire or on a little butane stove outside. This cooker saves lots of energy.

It is a safe and easy way to cook while traveling.
Put the meal on at 8am when you're packing up to go to the next campground. Pull up at  lunchtime and have some of the meal at a park or something (if you'd like to). Keep driving OR enjoy some sight seeing for the day and by dinnertime, when you're tired out and just finished setting up camp, dinner will still be warm (note- if you're frightened of 'bugs' these cookers are safe for around 8 hours, after that, they recommend some reheating, which is no drama, usually only takes a few minutes).

One last reason I REALLY wanted one was because I can prepare most meals at home and pop everything into a large Ziploc bag and freeze them flat. Then, when we go camping, just grab the top one out of the bus fridge or Esky and cook it up! Having frozen meals in the fridge will save on fridge energy, they will defrost slowly and safely and will take up less space all chopped up and flat, also, I won't be spending valuable relaxing time doing food prep. I'm considering buying a vac sealer... but we will have to see about that!
Have I convinced you yet?

Back to the original reason for this blog post...

If you look at the top of the page, I have added a tab labeled 'Thermal Cooker Recipes'. As I experiment, I'll add my 'hits and misses' recipes there, so you can use them too!

Feel free to message me or comment on here if you have any recipes or suggestions that I can add.
Happy cooking!

Tuesday 8 April 2014

Painting for the back of the bus

Hubby convinced me that I should do a mural type picture for the back of the bus.

So, a while back, we tootled off to Supercheap Auto and bought a $30 airbrush.

I had a couple of practises and put it away, thinking hubby had forgotten about the whole thing.

Yesterday he said "You know, if you airbrush the back of the bus, I can put all of the lights and handle back on it."

So I did it.

It is inspired by a picture I found on the internet but I can not find the source so I can give him creative credit (so credit to you if you ever see this Mr Artist!)

This is what I did yesterday. I kinda liked it black and white, but hubby wanted colour.

Here it is, all colourful. 

If you ever get the chance to have a go at this sort of thing, do it. It is pretty fun!

Friday 4 April 2014

Quickie post- Reversing Camera

The power went off the morning so we couldn't get into doing the rest of the bed storage. Instead, we installed the reversing camera.

When we first got the bus, one of the first things I bought was a new touchscreen stereo/GPS/DVD thingy for the hole in the dash where they used to have a cassette player and a radio. It came with a reversing camera.

The whole unit was about $300 from eBay. It is a generic brand (I can't even add a link to the auction because it was soooo long ago!)

Anyway, now that we have installed the bedhead, we were able to put in the camera!
We had to put the old brake light back in and luckily for us, it had a little stand from when it popped up from behind the back seat, when the bus was still a school bus. The little weeny camera fits perfectly under it, so you don't even know it is there.

Now for the pictures:
 Teeny-weeny thing it is!

Connects with regular AV plugs (supplied with the unit). We have tucked them in behind the bedhead and will cover the top of it with grey/black carpet which matches the boot.

Middle of the back window, lines up with the USB socket we have installed on the bedhead too! 
(Note: The USB socket has nothing to do with the reversing camera, that is there for charging gadgets when we are using the bus).

Install the brake light. Reversing camera is invisible. You can't even see it from the outside because of the tinted window... unless you REALLY look for it.


It works!